

How To Replace Exterior Window Trim
Welp, nosotros had some rot. Specifically, the trim around one of our exterior windows was rotting abroad. How can y'all tell if window trim is rotting away? It feels similar a sponge when y'all poke it. Wood is not supposed to resemble a sponge. Since winter is coming (don't laugh, nosotros take embarrassingly short summers!), Mrs. Frugalwoods and I are trying to knock out a few needed projects on the exterior of the ol' Frugalwoods home and this rotted window trim quickly ascended to the top of the list.
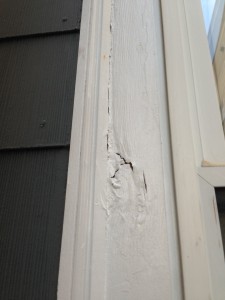
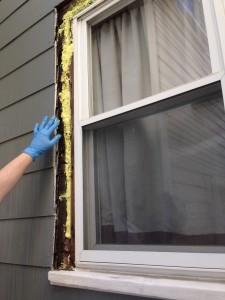
There be rot! Observe the indentation from my finger. Yeah, that's a bad sign!
Our reasons for replacing it were non entirely corrective–rotten window trim can allow water infiltrate behind your sheathing (the board, plywood, or OSB layer underneath your siding). If water gets to your capsule, all sorts of bad things happen: mold, rotting insulation, and in the worst cases, rotting framing members.
Nosotros're lucky because the window itself is a relatively new vinyl replacement window. Vinyl window are awesomely conditions resistant and then I knew we didn't have actual window issues. If our windows were wooden frames, we'd probable take a bigger problem on our easily.
Fixing it isn't rocket science, but the going local rate for this projection is $350-$500. Knowing that this toll is nigh entirely labor, we figured we could do meliorate, and we did!
Total Cost: $fourscore.33
Supplies:
- Tools:
- Drill / Driver for screwing the trim to the business firm. Nosotros needed to use screws instead of nails for this projection due to the type of trim we were installing. And while a standard cordless drill volition exercise fine for driving screws, an affect commuter will freaking change your life. This is the i I have, since information technology uses the aforementioned battery packs as my drill. I put off this purchase for a long time and I kicking myself for doing so.
- Pry bar for pulling apart the existing trim. For the longest time I resisted getting a existent i, thinking that I could do only fine with the claws on a hammer. I was impaired. Pry bars are astonishing and I now own 2 in unlike sizes. It makes pulling stuff apart easier, safer, and less probable to destroy things you don't intend to destroy.
- Circular Saw for cutting the trim to size. You could use a miter saw, or fifty-fifty a hand saw. But, I have a circular saw so that'south what I used. This project doesn't need a nice saw, so if y'all are in the market experience gratuitous to become an affordable model. I'd just recommend ane that plugs in rather than taking expensive and short-lived batteries.
- Carpenter'due south square for making directly lines. This is another tool that's piece of cake to ignore, merely volition brand your life easier and more accurate. I have an onetime one from a garage sale (fantabulous source of tools!) merely the standard stanley speed square is a great new option.
- Shop vac for cleaning the surface area during and after the build. Your neighbors and spouse will thank you. Wait for the cheap one to go on sale at domicile depot / lowes. Unless you are using one actually heavily… they're all pretty much the same. A handheld "dustbuster" can be used in a pinch, but clean it out well or you'll be getting yelled at! 🙂
- Measuring record for… I don't demand to explain this, right?
- Consumables:
- Cellular PVC trim. This stuff is magical. Looks like forest, cuts similar wood, takes pigment like wood… but it's plastic so it won't ever rot. This is what you lot want to use if you have to do trim work in wet areas. And if you're replacing previous trim considering of rot, and so you definitely want this. It's more expensive than normal poplar trim, just you'll never accept to do the job again.
- PVC compatible screws. PVC trim is nifty but you need special screws with reverse threads at the summit to foreclose it from mushrooming out when you lot drive it in. At that place are special trim screws for this, merely we found the same thing for less marketed as decking screws for blended decks. Might every bit well save a few bucks here.
- Spray Cream. At that place is a special kind made for windows and doors that won't aggrandize with enough force to bind the window. The "Corking Stuff" make is ubiquitous and but fine.
- Flashing. I used a flexible and glutinous asphalt flashing commonly known as "Ice and Water Shield." Information technology's sold in large rolls for roofs but you lot can also find smaller rolls meant for windows.
- Caulk. You want outside UV-rated paintable silicone caulk. The folks in the paint aisle can point you lot in the right direction from the multitude of caulk tubes. If this is your offset time using caulk, you'll too demand a caulk gun. Don't worry, they are cheap and sold near the caulk.
How To Supersede Outside Window Trim
Stride 1: Demo!
Demolition is my favorite part of any dwelling improvement projection. Nothing similar bashing things with hammers to make me smile! For this project through, you'll want to exist gentle.
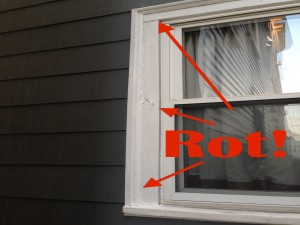
Outset try and figure out which trim sections are rotten. Our window had both a flat lath (sometimes called a "brick mold") too as a decorative molding. I originally thought it was simply the brick mold that was rotten, merely information technology turns out the molding was likewise getting soft in spots. Poke around with a screwdriver and you'll quickly annotation which components are in need of repair. If information technology feels like wood, great! If it feels rubbery or spongy… then it's time to tear it out!
Information technology'south Everywhere!
Once y'all've determined which components demand to get, use a pocket-size pry bar to outset removing the pieces. Your goal is to expose plenty of the boards to get accurate measurements. Once you can clearly see what's where, accept a photo and mensurate the dimensions. If you lot can keep the trim pieces from falling apart equally you demo, information technology will make cut your new pieces to fit all that much easier.
Now finish removing all trim boards and pray to the god of erstwhile houses that you lot don't discover additional rot as y'all delve deeper into your wall. If you do detect rotten sheathing or even framing… then you lot accept bigger problems. Non insurmountable, but also possibly not a weekend project. If that's the case, and so you should get find some other how-to post 🙂
Step 2: Shop
Now that you know the quantity and size of trim boards necessary, caput to your local home store and make a beeline for the structure supplies. Here's a pro-tip: Nearly of the pros are pretty nice. If you lot are confused, ask the guy in the filthy shirt with giant bulging muscles for advice. Dude will virtually e'er hook you lot up. In our case it was a very dainty Eastern European admirer with forearms the size of cantaloupes who explained the finer details between brands of cellular PVC trim.
Pace 3: Insulate
It'south time to inspect and insulate effectually the window. If you have a house congenital in the final 50 years, it won't look like this. Mod houses use plywood or OSB (oriented strand lath) every bit their sheathing. Besides being cheap, strong, and non requiring the devastation of one-time growth forests, OSB and plywood also brand for very tight window installs.
Former houses like ours have board sheathing. In improver to being expensive, weak, and requiring the wide-scale deforestation of nigh of the U.s.a., board capsule tends to be poorly fitted around windows. Case in point:
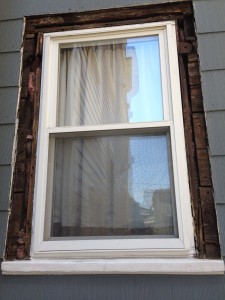
Here'due south how the window looked without any trim. Note the boards equally sheathing.
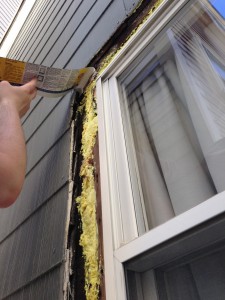
There'due south probably a better mode to practise this, simply wow do I love spray foam. The stuff is magical, especially for filling giant irregular voids.
Four extremely of import things to know about spray cream:
- Article of clothing latex gloves! This stuff is uber glutinous. Like interior of a hot marshmallow sticky. And it'due south not good for your skin. And y'all are nearly certain to get it all over your easily. Wearable some gloves and yous'll give thanks me later on.
- Make sure the area you'll be foaming is clean. Foam will stick to anything, including the layer of grit and dirt that likely resides effectually your window. A shop vac makes short piece of work of this.
- After it's applied, it continues foaming and expanding. And so make sure yous lay down a thinner layer than you need and permit it expand to fill. You can always add some more on the 2d pass.
- Once you break the seal and pull the trigger on the can of foam there'southward no stopping. You can't re-use a can of spray cream and it starts to harden in the tube after virtually 15 minutes. Sooner if you lot don't spray for a few moments. You accept to proceed moving and spraying if you desire to go your coin'southward worth out of the can.
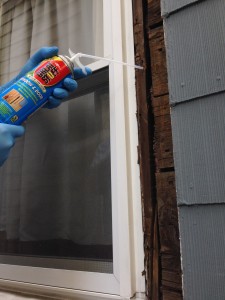
Me to Mrs. Frugalwoods: Take all the photos you want Before I get-go spraying…
Then have a program! Motion quickly and evenly apply a light layer of foam wherever your voids are deepest. Proceed working your way around the window filling cracks, voids, holes, and whatever else gets in your way. In our case, we had behemothic voids to fill. If you have a newer home y'all might only have the surface area immediately adjacent to the window frame to insulate. In either case, insulation is worth the money while you lot have the window opened up. Might besides exercise information technology correct.
Afterward you lot've foamed all in that location is to be foamed (plus some stuff that probably shouldn't have been, only you lot know how it goes…) take a break while the foam hardens. Information technology should be fine to proceed working after twenty minutes or so.
Just look at that nicely foamed (sort of) window opening!
Step iv: Flash that window!
If your house was built correctly, you won't demand to do this step as you'll already accept flashing. As for us, we needed it.
Flashing a window is a style to seal the area around the window from water infiltration while allowing whatsoever water that gets backside the trim boards to exit the wall structure. You can use all mode of materials as flashing: plastic, aluminum, atomic number 82 (yes, and it works great!). We chose a flexible, viscous asphalt product unremarkably know in the trade as "Ice and H2o Guard."
This stuff is actually like shooting fish in a barrel to use. But cut your pieces to size, pare the backing paper off, and stick information technology up.
Pro-tip: Don't pare the paper off the flashing until it'southward in place. This stuff volition stick to anything and everything!
You'll want to apply the various pieces effectually the window from bottom to top. That is, you want water to exist able to travel down the confront of the flashing and never discover an overlapped seam facing upwards. For the top strip of flashing, endeavor to get it every bit far underneath the layer of siding above equally possible. For the flashing on the sides, try to end the flashing on top of the lesser form of siding. This sounds great in theory, only reality can prevent information technology from being perfect. Just try the best you can.

Look at that nicely flashed window!
Pace v: Measure and cut trim boards
At present measure for your trim and cut. I similar working from the top down, simply I have no thought if that's really better.
Our old brick mold wasn't mitered in the corners then I followed the pattern and butt jointed it. Yes, I just said barrel joint. It's a carpenter's term, for real. To cutting a straight line with a chop saw or miter saw is unproblematic. If you are making the cut with a circular saw, draw a direct line on the board with a carpenter's square to make sure you don't wander. Don't exist a cowboy, y'all and I both know you can't eyeball it.
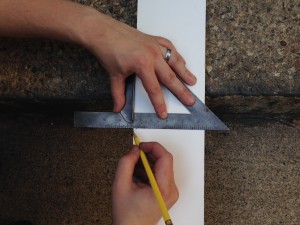
Use your handy dandy carpenter'southward foursquare to make a prissy correct bending.
While the left side and top of the window was a dead ringer for 1×5, the right side was juuuust also small for me to wedge it in at that place. Oh the joys of one-time houses! So I scribed the ane×5 to match the variation in the siding edge and ripped it with the circular saw. This I did by and large eyeball considering I knew I would be covering the crappy edge with the decorative molding. Screw the boards in place with your peachy special screws (they are actually pretty neat) and pace back and admire how much more like a window information technology looks already!
Step 6: Miter your decorative molding
Different your trim lath brick mold, decorative molding is pretty ugly in the corners unless you lot cut it on a 45 caste angle–aka a miter articulation.
When faced with cut a miter articulation, normal folks would get out and buy a miter saw. This makes information technology really easy to cut perfect miters every time, but will run y'all a couple hundred dollars.
If yous are like me and a member of team "if information technology tin't be done with a circular saw then yous shouldn't be doing it," then read on. Cut a 45 degree miter is not much harder than a 90 degree straight cut. The play tricks is getting a good line in place, and for that the carpenter's square is essential. Measure carefully to the outside of the miter (the longest role) and bank check your marks twice before cutting. Information technology'south really easy to get dislocated and draw your 45 degree line in the incorrect direction (ask me how I know this…).

Steady hands and a skillful line to follow brand cutting a miter with a round saw non that bad.
Once you have your line in place, advisedly follow it with your circular saw. If you go slowly and cheque your measurements, no ane will ever know you didn't employ a miter saw. Now screw in your molding and admire your handiwork!
Step seven: Caulk
Oh y'all thought you were finished? Non quite. Suspension out the caulk and run a bead on all of the joints. Smooth each joint with a moist finger (no joke, the best way to become a good caulk line). Don't forget to add a dab of caulk to each screw pigsty too.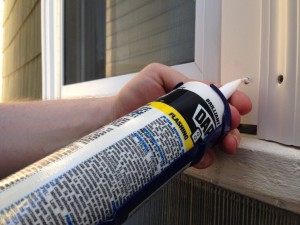
In one case the caulk is dry you can decide whether you desire to paint. And then far we haven't, considering the new white trim matches our existing trim pretty well.
Step viii: Victory!
Now you are actually done. Bask in the glory of saving hundred of dollars. Revel in the new confidence you built in your DIY skills. Or just take a shower. You probably need a shower real bad by now.
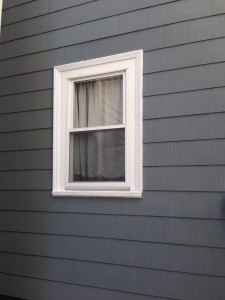
The finished product!
Why practice all this?
Nosotros're focused on edifice (hah!) a sustainable life, both from a skills-learning perspective AND from a stable fiscal perspective.
Our immediate goal is to "retire" early to a homestead in Vermont and get out our city jobs behind.
As function of that programme, we've embarked on a journey of radical (sometimes hilarious) frugality. Sometimes information technology's trimming a window, other times it'southward cut my wife's hair at home (fashion scarier for me than window trim!)
Want to know more than? Check out our Most folio to investigate the radical frugality journey so far.
Hope your ain window trim project goes well! Feel free to enquire questions in the comments — we notwithstanding read and respond to them fifty-fifty though this post is near a year old.
Never Miss A Story
Sign up to go new Frugalwoods stories in your e-mail inbox.
Success!
Source: https://www.frugalwoods.com/2014/07/30/how-to-replace-exterior-window-trim/
Posted by: volpesether90.blogspot.com
0 Response to "How To Replace Exterior Window Trim"
Post a Comment